SpringBoot with LiquiBase using Groovy
Build by Gradle
1. Overview
Database schema migration is performed on a database whenever it is necessary to update/revert changes in the database or need to migrate the database from one version to other. There are two major migration tools: Liquibase, Flyway.
In this tutorial, we will go with the Liquibase. The Liquibase is open source tool for database schema migration or database version controlling. It supports most of the major databases and different type of format for schema change file like XML, SQL, YAML, JSON. It is database vendor independent means it does not depend on any DB specific syntax. It can generate database change documentation.
In this tutorial, we will learn how to configure Liquibase with Spring Boot project. Here, we will write database schema changes in XML format. Those schema changes will be automatically performed on the configured database using liquibase when spring boot project will be started.
Here, we will consider 3 simple database operations:
1). Create table,
2). Insert data into table and
3). Update data on precondition.
Those operations will be executed by liquibase on H2 database with spring boot.
1). Create table,
2). Insert data into table and
3). Update data on precondition.
Those operations will be executed by liquibase on H2 database with spring boot.
2. Example
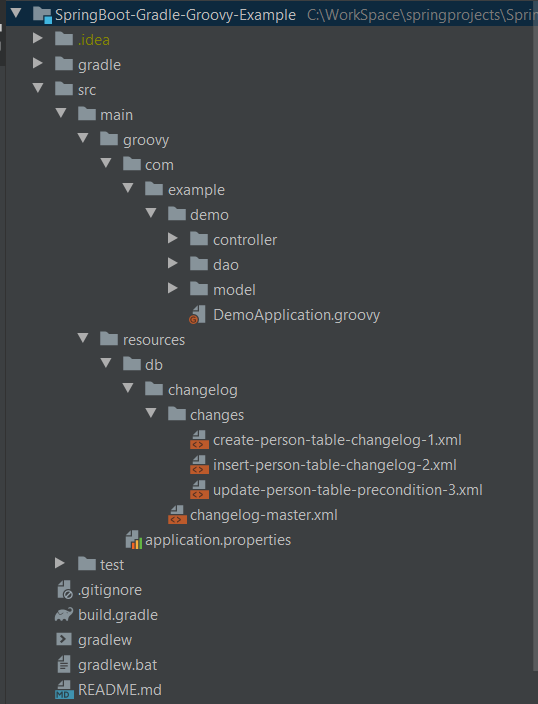
2.1 Project Structure
2.2 POM file configuration
Add dependencies liquibase-core, spring-boot-starter-jdbc for Liquibase support. The h2 dependency added for in-memory H2 database on which we will perform DB operations.
plugins {
 id 'org.springframework.boot' version '2.2.4.RELEASE'
 id 'io.spring.dependency-management' version '1.0.9.RELEASE'
 id 'groovy'
}

group = 'com.example'
version = '0.0.1-SNAPSHOT'
sourceCompatibility = '1.8'

configurations {
 developmentOnly
 runtimeClasspath {
  extendsFrom developmentOnly
 }
}

repositories {
 mavenCentral()
}

dependencies {
 implementation 'org.springframework.boot:spring-boot-starter-batch'
 implementation 'org.springframework.boot:spring-boot-starter-jooq'
 implementation 'org.springframework.boot:spring-boot-starter-web'
 implementation 'org.codehaus.groovy:groovy'
 implementation 'org.liquibase:liquibase-core'
 developmentOnly 'org.springframework.boot:spring-boot-devtools'
 runtimeOnly 'com.h2database:h2'
 testImplementation('org.springframework.boot:spring-boot-starter-test') {
  exclude group: 'org.junit.vintage', module: 'junit-vintage-engine'
 }
 testImplementation 'org.springframework.batch:spring-batch-test'
}

test {
 useJUnitPlatform()
}
2.3 application.properties
Change log file is the main point from where Liquibase looks for configuration. If we do not define change log file path in Spring Boot, it considers db/changelog/db.changelog-master.yaml as default path for YAML format. As we will go with XML format, we need to set spring.liquibase.change-log=classpath:/db/changelog/changelog-master.xml for change log file path in application.properties file. You can set logging level of liquibase logs by setting log level in logging.level.liquibase property. Other properties in given below properties file are for H2 database configuration.
spring.liquibase.change-log=classpath:/db/changelog/changelog-master.xml
logging.level.liquibase = DEBUG

spring.datasource.driver-class-name=org.h2.Driver
spring.datasource.url=jdbc:h2:mem:test;
spring.datasource.username=sa
spring.datasource.password=
spring.h2.console.enabled=true
2.4 Change Log Files
2.4.1 changelog-master.xml
First, create the master change log file changelog-master.xml with default liquibase XML format at configured change log path. We can define all changes in one master file but it can be hard to manage after the huge number of changes. So, we will define each changeSet in different change log file and that change files will be included in master change log file by tag as per below. The ordering of included file should be always in correct sequence.
<?xml version="1.0" encoding="UTF-8"?>
<databaseChangeLog
        xmlns="http://www.liquibase.org/xml/ns/dbchangelog"
        xmlns:xsi="http://www.w3.org/2001/XMLSchema-instance"
        xmlns:ext="http://www.liquibase.org/xml/ns/dbchangelog-ext"
        xsi:schemaLocation="http://www.liquibase.org/xml/ns/dbchangelog http://www.liquibase.org/xml/ns/dbchangelog/dbchangelog-3.1.xsd
    http://www.liquibase.org/xml/ns/dbchangelog-ext http://www.liquibase.org/xml/ns/dbchangelog/dbchangelog-ext.xsd">

    <include file="/db/changelog/changes/create-person-table-changelog-1.xml"/>
    <include file="/db/changelog/changes/insert-person-table-changelog-2.xml"/>
    <include file="/db/changelog/changes/update-person-table-precondition-3.xml"/>
</databaseChangeLog>
2.4.2 create-person-table-changelog-1.xml
Now create first change log file create-person-table-changelog-1.xml at shown in the path above file. The tag must be the root element in every change log file. Write database related operation in tag with author and unique id attribute in liquibase defined XML syntax. As per best practice, write one change per changeSet to avoid failed auto-commit statements. Below, changeSet will create table person with three columns named id, name and address in the test H2 database. We can also perform a rollback on changes performed. For manual rollback, we need to define the operation in rollback tag. That rollback can be performed by maven command using till tag, date or change count (maven rollback).
<?xml version="1.0" encoding="UTF-8"?>
<databaseChangeLog
        xmlns:xsi="http://www.w3.org/2001/XMLSchema-instance"
        xmlns:ext="http://www.liquibase.org/xml/ns/dbchangelog-ext"
        xmlns="http://www.liquibase.org/xml/ns/dbchangelog"
        xsi:schemaLocation="http://www.liquibase.org/xml/ns/dbchangelog http://www.liquibase.org/xml/ns/dbchangelog/dbchangelog-3.1.xsd
    http://www.liquibase.org/xml/ns/dbchangelog-ext http://www.liquibase.org/xml/ns/dbchangelog/dbchangelog-ext.xsd">

    <changeSet author="admin" id="1">
        <createTable tableName="person">
            <column autoIncrement="true" name="id" type="INT">
                <constraints primaryKey="true"/>
            </column>
            <column name="name" type="VARCHAR(255)">
                <constraints nullable="false"/>
            </column>
            <column name="address" type="VARCHAR(255)"/>
        </createTable>
        <rollback>
            <dropTable tableName="person"/>
        </rollback>
    </changeSet>
</databaseChangeLog>
2.4.3 insert-person-table-changelog-2.xml
Now create second change log file insert-person-table-changelog-2.xml at shown in the path above file. This file’s changeSet will perform insert values operation for person table. You can find more database operation syntax for liquibase at this link.
<?xml version="1.0" encoding="UTF-8"?>
<databaseChangeLog
        xmlns:xsi="http://www.w3.org/2001/XMLSchema-instance"
        xmlns:ext="http://www.liquibase.org/xml/ns/dbchangelog-ext"
        xmlns="http://www.liquibase.org/xml/ns/dbchangelog"
        xsi:schemaLocation="http://www.liquibase.org/xml/ns/dbchangelog http://www.liquibase.org/xml/ns/dbchangelog/dbchangelog-3.1.xsd
    http://www.liquibase.org/xml/ns/dbchangelog-ext http://www.liquibase.org/xml/ns/dbchangelog/dbchangelog-ext.xsd">

    <changeSet author="admin" id="2">
        <insert tableName="person">
            <column name="id" valueNumeric="1"/>
            <column name="name" value="Tom"/>
            <column name="address" value="USA"/>
        </insert>
    </changeSet>
</databaseChangeLog>
2.4.4 update-person-table-precondition-3.xml
Now create third change log file update-person-table-precondition-3.xml at shown in the path above file. In this file, we have used tag for defining preconditional statement. The changes will be executed in DB only when precondition will be satisfied. Here, we have given the condition for DBMS type must be h2. We can perform different conditions based on different factors like tableExist, sqlCheck, columnExist, etc (preconditions). Below changeSet will update the value in person table.
<?xml version="1.0" encoding="UTF-8"?>
<databaseChangeLog
        xmlns:xsi="http://www.w3.org/2001/XMLSchema-instance"
        xmlns:ext="http://www.liquibase.org/xml/ns/dbchangelog-ext"
        xmlns="http://www.liquibase.org/xml/ns/dbchangelog"
        xsi:schemaLocation="http://www.liquibase.org/xml/ns/dbchangelog http://www.liquibase.org/xml/ns/dbchangelog/dbchangelog-3.1.xsd
    http://www.liquibase.org/xml/ns/dbchangelog-ext http://www.liquibase.org/xml/ns/dbchangelog/dbchangelog-ext.xsd">

    <changeSet author="admin" id="3">
        <preConditions>
            <dbms type="h2"/>
        </preConditions>
        <update tableName="person">
            <column name="address" value="India"/>
            <where>name = 'Tom'</where>
        </update>
    </changeSet>
</databaseChangeLog>
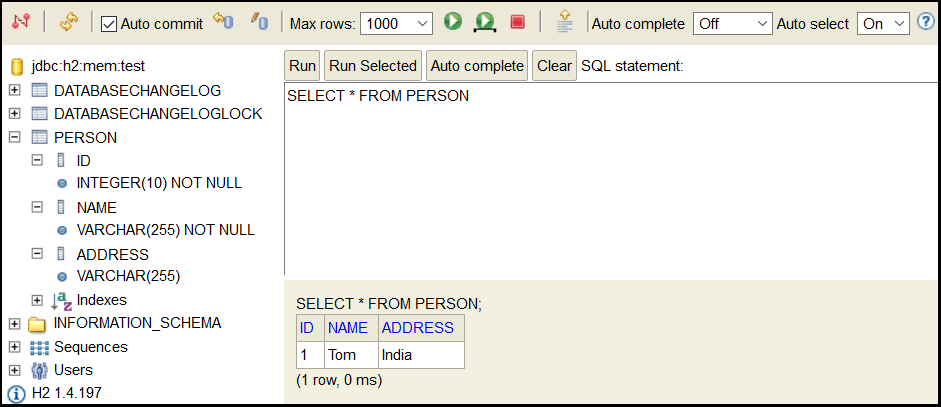
2.5 Output
Run mvn spring-boot run command and run spring boot application. Now, open http://localhost:8080/h2-console/ url in the browser. Login with database properties configured in application.properties file. Write SELECT * FROM PERSON in textarea and click on Run. Your three database changes(create table, insert into table and update table with precondition) has been reflected in the output. You can also perform one by one changeSet and check the output.
3. Important properties related to Liquibase and Spring application
We can write following properties in application.properties file for more specific configurations –
References
For Liquibase Reference : https://docs.liquibase.com/change-types/home.html
Download from GitLab
References
spring.liquibase.change-log=classpath:/db/changelog/db.changelog-master.yaml # Change log configuration path.
spring.liquibase.check-change-log-location=true # Whether to check that the change log location exists.
spring.liquibase.contexts= # Comma-separated list of runtime contexts to use.
spring.liquibase.database-change-log-lock-table=DATABASECHANGELOGLOCK # Name of table to use for tracking concurrent Liquibase usage.
spring.liquibase.database-change-log-table=DATABASECHANGELOG # Name of table to use for tracking change history.
spring.liquibase.default-schema= # Default database schema.
spring.liquibase.drop-first=false # Whether to first drop the database schema.
spring.liquibase.enabled=true # Whether to enable Liquibase support.
spring.liquibase.labels= # Comma-separated list of runtime labels to use.
spring.liquibase.liquibase-schema= # Schema to use for Liquibase objects.
spring.liquibase.liquibase-tablespace= # Tablespace to use for Liquibase objects.
spring.liquibase.parameters.*= # Change log parameters.
spring.liquibase.password= # Login password of the database to migrate.
spring.liquibase.rollback-file= # File to which rollback SQL is written when an update is performed.
spring.liquibase.test-rollback-on-update=false # Whether rollback should be tested before update is performed.
spring.liquibase.url= # JDBC URL of the database to migrate. If not set, the primary configured data source is used.
spring.liquibase.user= # Login user of the database to migrate.
For Liquibase Reference : https://docs.liquibase.com/change-types/home.html
Download from GitLab