Here we have simple application with one controller. Nothing much to discuss.
2. Create Dockerfile in below path.
FROM adoptopenjdk/openjdk11:alpine-jre
ADD target/SpringBoot-Docker-Kubernates-0.0.1-SNAPSHOT.jar app.jar
ENTRYPOINT ["java","-jar","app.jar"]
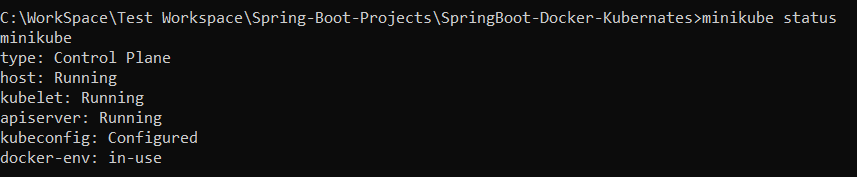
Before build Dockerfile check whether minikube is started? type command minikube status you will get the status as below,
Here it is running. If not you can run the command minikube start.
Normally docker images will not be available for minikube. So run minikube docker-env. This will give below command.
Run @FOR /f "tokens=*" %i IN ('minikube -p minikube docker-env') DO @%i in command prompt. Now if you run docker images we can get images for minikube. So
Now to build this application type following command. docker build -t springboot-k8s:2.0 . Now our application image is available in the docker images as below,
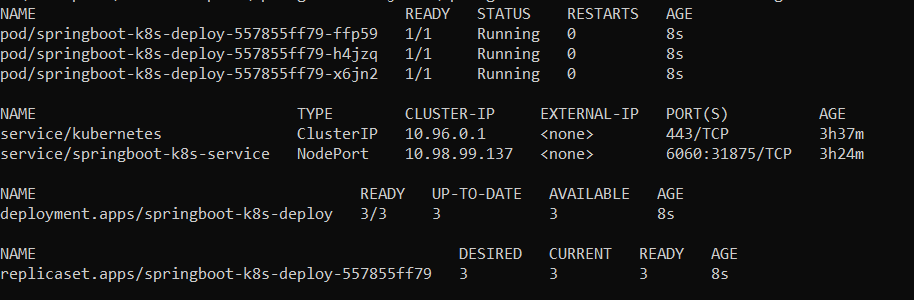
3. Create deployment and service yaml file for Kubernetes
We can see all pods, services and deployments here.
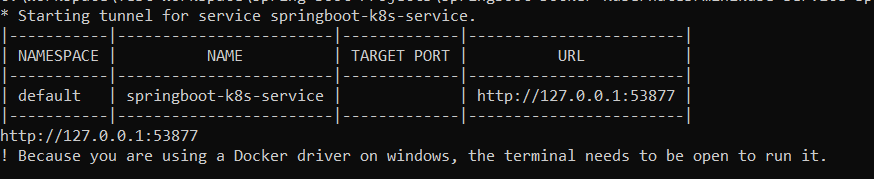
Run below command to get the url of minikube to access the services.
minikube service springboot-k8s-service --url
Now we can get the url to access minikube as per below screenshot.
That's all about deployment of spring boot application with Docker and kubernetes (minikube). We'll catch up with other topics in future.
Key Notes:
To access Ubuntu terminal in windows,
1. we should type kubectl config view in command prompt. Then copy the server ip.
2. Then we should go to terminal and type vi ~/.kube/config. This will open config file. There we should edit the below highlighted part from the screenshot. Mostly it will be port number.
You write a very simple test that fails. Then you write as little code as possible to make the test pass. You then write a slightly more complex test case that fails. Then you make it pass with as little code as possible. And around and around you go, in this cycle that should be complete in mere minutes (if not seconds).
This cycle is known as the Red-> Green cycle.
1.2 You must refactor!
However, there is an extremely important step between the passes and the next failure. You must refactor your code where appropriate. You could make any test pass with enough if statements and hard-coding, but it would be useless code. Useful code is better. And when you refactor, you refactor without fear of breaking your existing functionality. You have no fear, because your full set of tests will let you know if anything breaks.
This cycle is known as the Red-> Green-> Refactor cycle. This cycle is Test Driven Development.
1.3 So why should we do it?
You will be fearless
Code will be streamlined
You will reduce debugging time.
Your tests will become the most comprehensive set of documentation imaginable
Your code will have better design
Need not worry about code coverage
1.4 Drawbacks
Bugs in Tests
Slower at the beginning
All the members of the team need to do it
Test need to be maintained when requirements changes
2. Let's start with an Example:
Mostly now a days we follow agile workflow model. So we will get requirements via UserStories. Here let's assume that we got one userstory with following endpoints. Acceptance Criteria:
Expose below Rest URLS:
1./cars/{name} - Get Car details by name [GET]
2./cars/{name} - Throw CarNotFoundException
2.1 Create Spring Boot Application with any IDE you prefer.
I'm using Intelij here where Spring Assistant plugin is used.
Select Spring Boot version and required Libraries.
Since we are going to use Junit 5 along with Spring boot Please include below dependencies too,
Let's start from Controller. I'm going to take you to the tour where how step by step programming is happening with the help of Test Driven Development Approach. First we'll create CarControllerTest. Here we are going to create an end point for - /cars/{name}.
At line @WebMvcTest(controllers = CarController.class) code will give you an error saying that CarController class is not available. Hence we'll go to src/main folder and will create just CarController without Body.
publicclassCarController {
}
Now the compilation error is resolved. When we run CarControllerTest class now, we end-up with the failed message as below,
The reason for below error is that, because there is no rest endpoint with url /cars/Scala in CarController class. Let's create the endpoint in CarController class.
From above code, what are we expecting from test is that, when we pass /cars/Scala, then the response should contain Car object with Scala as name and Sadan as type. Now we'll execute the test. The reason for this that we are passing car object with null values in it.
Lets assume that from external class CarService, we will get the car details. Base on that assumption, in CarController lets change below line,
@AutowiredCarService carService;
@GetMapping("/{name}")
publicResponseEntity<Car> getCarDetails(@PathVariableString name) throws Exception {
Car car = carService.getCarDetails(name);
returnnewResponseEntity<>( car,HttpStatus.OK);
}
Now we need to create CarService class with method getCarDetails without body.
With above line we are defining the behaviour in such a way that, if we pass any String as name it should return new Car details. Now lets run the test once again. Yes it is passed.
Lets assume if no car details avaliable for the given name, what would happen. For this scenario we need to create CarNotFoundException class which will be throwed when no car details present for given name.
If you run this test method it will work like charm. So far we completed two scenarios one with valid response and another with Exception throwed in Controller class level.
Now lets move to CarService Class. As we know so far we did not touch CarService class as part of CarControllerTest. Now Lets create CarServiceTest which is dedicated to CarService class.
2.4 Service Unit Test
Here we are going to use only Mockito related setup to ensure that how getCarDetails method is working. Here also we have two scenarios one with valid result from CarRepository and another with CarNotFoundException. Create CarRepository with findByName(name) interface first.
As per above code we can see we did not bother about the logic behind CarRepository class. We are just mocking them by our expectations. we can run now. Yes both test methods are passed.
2.5 Repository Unit Test
Now lets focus on CarRepository interface. We need to ensure that the CarRepository's method findByName should give us proper data fetched from database. Here we are going to use Embedded H2Database. Under src/main/resources folder add data.sql file just like below,
DROPTABLE IF EXISTS CARS;
CREATETABLECARS (
id INT AUTO_INCREMENT PRIMARY KEY,
name VARCHAR(250) NOT NULL,
type VARCHAR(250) NOT NULL
);
INSERT INTO CARS (id, name, type) VALUES ('1001','duster','hybrid');
INSERT INTO CARS (id, name, type) VALUES ('1002','micra','hatchback');
INSERT INTO CARS (id, name, type) VALUES ('1003','lodgy','suv');
What will happen here is that when we run @DataJpaTest annotated CarRepositoryTest class, these data will be stored in H2 Database untill the execution of test method is over.
Now go to CarService class and annotate getCarDetails method with @Cacheable("cars").
Lets create CacheTest class. Just be clear that since we are going to verify cache, we need to use @SpringBootTest in this class,
@SpringBootTestpublicclassCacheTest {
@MockBeanCarRepository carRepository;
@AutowiredCarService carService;
@TestvoidcacheTest() {
given(carRepository.findByName("pulse")).willReturn(Optional.of(newCar("pulse", "hatchback")));
Car car = carService.getCarDetails("pulse");
assertNotNull(car);
carService.getCarDetails("pulse");
Mockito.verify(carRepository,Mockito.times(1)).findByName("pulse");
}
}
Here with the help of Mockito's verify method we are ensuring that carRepository's findByName method is called only once,though we called carService.getCarDetails() twice.
2.7 Integration Test
Now let create IntegrationTest class to ensure entire flow is working fine.